Creating an element type
Creating an element type takes two steps:
- Create a form using Advanced Custom Fields (ACF)
- Write code that uses form data to output the element's HTML
After doing this tutorial, you'll be able to create a simple element type in five minutes. What makes this so easy is that you'll only have to write code where absolutely necessary. A huge part of the work (creating the edit form for your element) is handled by ACF's excellent graphical form generator.
1. Creating the form
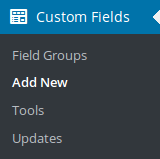
With ACF installed, log into the Wordpress admin panel and go to "Custom Fields" "Add New".
This is where you define a set of fields that will later be used to create an element. The interface is pretty self-explanatory, but there's also a short tutorial available in the ACF docs.
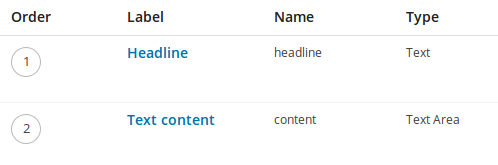
In this example, we'll create a simple element type with two fields called headline and content. Labels are only cosmetic, but make sure to enter the field names and types as shown.
Select the correct location rule
Scroll down to location rules and select "Use with Layotter" "is equal to" "Use as element".

Feel free to combine this with other location rules – e.g. you can enable an element type for a specific post type only.
Write down the field group slug
To connect your new form with a Layotter element in the next step, you'll need either its post ID or slug. The post ID can simply be taken from the URL right after saving the field group.
We recommend using the slug instead of the post ID though, as the ID might change at some point, creating errors and headaches. The slug will never change, not even if you migrate your site to another database. Follow these steps to get the slug:
-
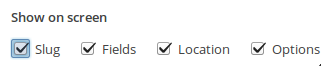
Click the "Screen Options" button at the very top right of the page

-
Check the "Slug" checkbox
-
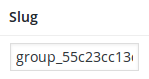
Scroll down to the very bottom of the page and copy the slug from a small text field
2. Writing the element
Now that the field group is ready, we'll write some code that connects it to a Layotter element.
Element types are created by extending the Layotter_Element class and adding three methods:
attributes()will define basic attributes like a name and descriptionfrontend_view($fields)will output the frontend HTML that your site's visitors will seebackend_view($fields)will output a backend representation of this element that editors will see when they edit a page
All three methods must be declared protected.
class Text_Element extends Layotter_Element
{
    protected function attributes() {
        // ...
    }

    protected function backend_view($fields) {
        // ...
    }

    protected function frontend_view($fields) {
        // ...
    }
}
attributes()
attributes() must define these attributes:
$this->title– a human-readable name$this->description– a human-readable short description$this->icon– the name of an icon from the Font Awesome icon set$this->field_group– slug or ID of the ACF form to be used for this element type (the one you wrote down in the previous step)
attributes() may also define:
$this->order– an integer that can be used to override alphabetical ordering in the "Add Element" screen (defaults to0if none is provided)
class Text_Element extends Layotter_Element
{
    protected function attributes() {
        $this->title       = 'Text';
        $this->description = 'Simple text element with a headline and some text content';
        $this->icon        = 'font';
        $this->field_group = 'group_abcdefg123456';
    }

    // ...
}
frontend_view($fields)
frontend_view($fields) must output the frontend view for this element type. An array of user-provided field values is passed in as a parameter.
class Text_Element extends Layotter_Element
{
    // ...

    protected function frontend_view($fields) {
        echo <<< EOF
            <div class="text-element">
                <h2>{$fields['headline']}</h2>
                <p>
                    {$fields['content']}
                </p>
            </div>
EOF;
    }

    // ...
}
Keys for all fields will always be present (even if they're empty), so you won't have to run them through isset().
backend_view($fields)
backend_view($fields) must output the backend view for this element type (that will be used to represent an element in the drag-and-drop editor). An array of user-provided field values is provided as a parameter.
class Text_Element extends Layotter_Element
{
    // ...

    protected function backend_view($fields) {
        echo <<< EOF
            <span class="headline">{$fields['headline']}</span>
            <p>
                {$fields['content']}
            </p>
EOF;
    }
}
Keys for all fields will always be present (even if they're empty), so you won't have to run them through isset().
Registering the element
Finally, use the Layotter::register_element() method to tell Layotter about your newly created element type. The method takes two parameters:
- A unique ID that will identify this element type internally, lowercase letters and underscores only – we'll pick
text_sectionfor this example - The name of your class
class Text_Element extends Layotter_Element
{
    // ...
}

Layotter::register_element('text_section', 'Text_Element');
And that's it!
Your first element type is ready for use! Read the next page to learn how to include element-specific CSS and Javascript.
Complete, working example code (a field group called group_abcdefg123456 has to be present):
class Text_Element extends Layotter_Element
{
    protected function attributes() {
        $this->title       = 'Text';
        $this->description = 'Simple text element with a headline and some text content';
        $this->icon        = 'font';
        $this->field_group = 'group_abcdefg123456';
    }

    protected function frontend_view($fields) {
        echo <<< EOF
            <div class="text-element">
                <h2>{$fields['headline']}</h2>
                <p>
                    {$fields['content']}
                </p>
            </div>
EOF;
    }

    protected function backend_view($fields) {
        echo <<< EOF
            <span class="headline">{$fields['headline']}</span>
            <p>
                {$fields['content']}
            </p>
EOF;
    }
}

Layotter::register_element('text', 'Text_Element');